Simple Photo Editing in Lightroom for Beginners
Welcome to the wonderful world of photo editing! If you’re just starting out with photography, learning how to edit your images can feel overwhelming. Adobe Lightroom is a powerful and popular choice for photographers of all levels, but especially great for beginners because it’s non-destructive (meaning your original photo isn’t altered) and offers a user-friendly interface. This tutorial will guide you through some essential adjustments to take your photos from good to great.

Understanding Lightroom’s Interface – The Basics
Before we jump into adjustments, let's briefly touch on the Lightroom interface. You’ll primarily work in the ‘Develop’ module. This is where all the editing magic happens. On the right-hand side, you'll see a panel of sliders – these are your tools! Take a moment to familiarize yourself with them. Don’t worry about understanding everything just yet; we're focusing on a few key adjustments in this tutorial. Getting the composition right in camera is often the key to a great photo; even with powerful editing tools like Lightroom, starting with a well-composed shot makes the process much smoother. Consider researching the Rule of Thirds to improve your initial compositions – it's a foundational technique for compelling visuals.
Key Adjustments for Beginners
Let's dive into the most common and impactful adjustments you can make in Lightroom. These will help you improve the overall look and feel of your photos.
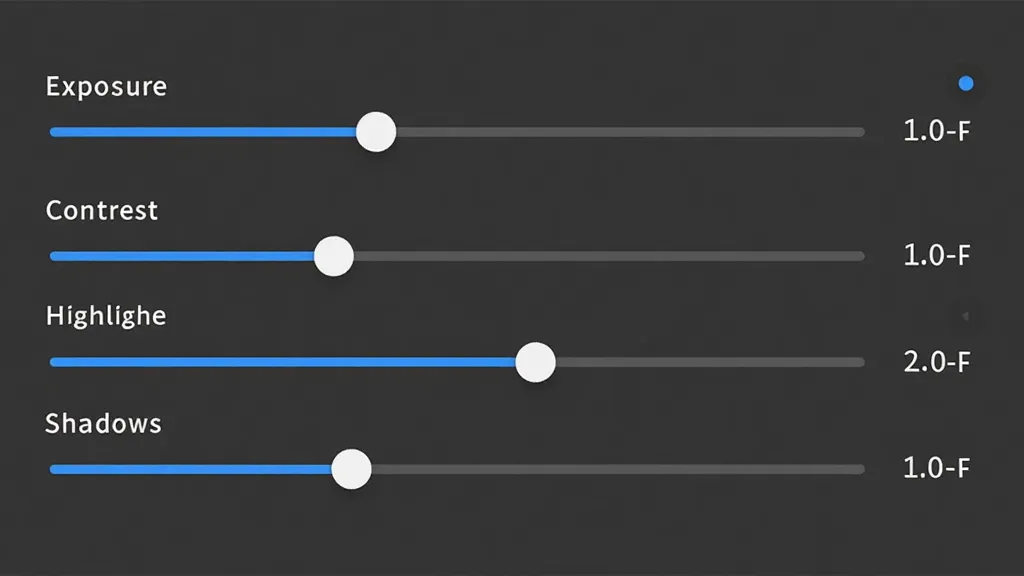
Exposure
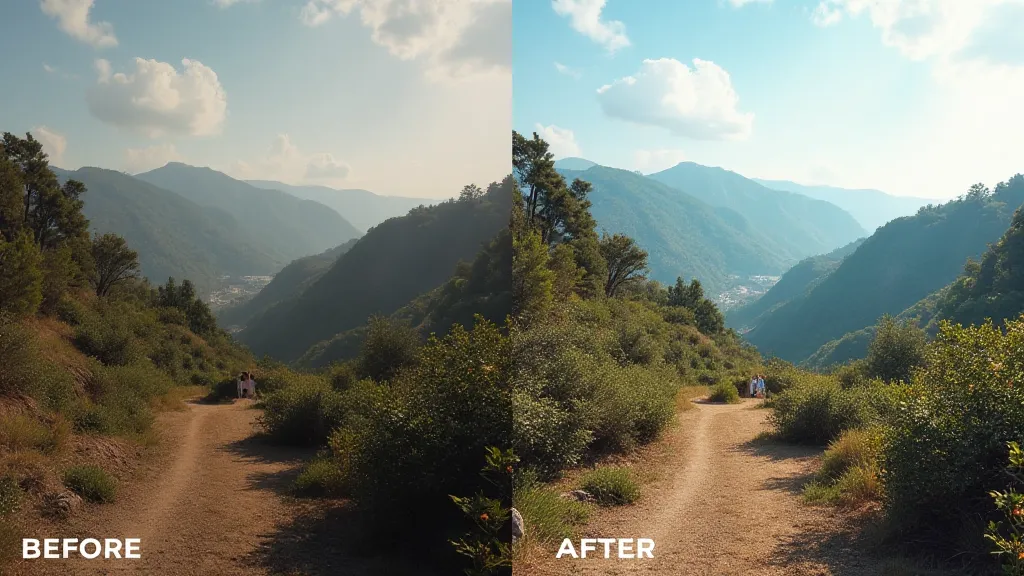
Exposure controls the overall brightness of your image. If your photo looks too dark, increase the Exposure slider. If it's too bright, decrease it. Subtle adjustments are key; avoid pushing the slider too far, as this can lead to a loss of detail in highlights and shadows. Understanding how light interacts with your subject is crucial, and it’s a concept that goes hand-in-hand with exposure. Proper lighting dramatically impacts the final result, regardless of your editing skills.
Contrast
Contrast refers to the difference between the lightest and darkest areas of your image. Increasing Contrast can make your photo look more dramatic and punchy, while decreasing it can create a softer, more muted look. Experiment to see what suits your style. Contrast is closely related to how the human eye perceives depth and form. Finding the right balance can make your images feel more impactful.
Highlights
The Highlights slider specifically targets the brightest parts of your image. If you have blown-out highlights (areas with no detail), try decreasing the Highlights slider to recover some of that lost information. Be careful not to decrease it too much, as it can make the image look flat. Recovering details in highlights often requires a delicate touch.
Shadows
Conversely, the Shadows slider controls the darkest parts of your image. If your shadows are too dark and lack detail, increasing the Shadows slider can bring them back into the light. This is particularly useful for photos taken in low-light conditions. Often, capturing detail in shadows involves finding the ideal balance with highlights; it's a delicate dance between light and dark.
White Balance
White Balance adjusts the color temperature of your image. Photos can sometimes have a color cast, appearing too warm (orange/yellow) or too cool (blue). Lightroom offers several ways to adjust white balance, including using presets, the eyedropper tool (to click on a neutral area), or manually adjusting the Temperature and Tint sliders. Achieving accurate colors is more than just correcting a color cast; it's about conveying the mood and atmosphere of the scene. When working with people, consider how color impacts their appearance and the overall narrative you want to tell. A solid understanding of portrait photography basics, including lighting and posing, can significantly enhance your final edits.
A Simple Editing Workflow
Here’s a suggested workflow for beginner Lightroom edits:
- Import your photos: Import your raw images into Lightroom.
- Basic Adjustments: Start with Exposure, Contrast, Highlights, and Shadows. Make small, incremental changes.
- White Balance: Correct any color casts.
- Sharpening: Add a touch of sharpening to enhance details (be subtle!).
- Review: Zoom in and carefully review your edits, making any further adjustments as needed.
Beyond the Basics: Depth, Detail, and Mood
Once you're comfortable with the basic adjustments, you can start exploring more advanced techniques. Understanding how to manipulate depth of field is crucial for creating visually compelling images. It’s not just about blurring the background; it's about controlling the viewer's focus and guiding their eye through the scene. Learning about understanding depth of field will give you more creative control over your images.
Many photographers also incorporate creative color grading techniques to enhance the mood and atmosphere of their photos. While not essential for beginners, it's a rewarding skill to develop over time. Consider how colors evoke specific emotions and how you can use them to tell a story.
Color Grading: Painting with Light
Color grading is the process of selectively altering the colors in your image to achieve a specific look or feel. It’s a powerful tool for creating mood, emphasizing certain elements, or simply adding a unique artistic touch. Lightroom offers several tools for color grading, including the HSL panel (Hue, Saturation, Luminance) and the Color Grading panel (split toning).
The HSL panel allows you to adjust the hue, saturation, and luminance of individual colors. This is useful for correcting color casts, enhancing specific colors, or creating subtle color shifts. The Color Grading panel allows you to adjust the color balance in the highlights, shadows, and midtones, creating a more complex and nuanced look.
It's important to remember that color grading is a subjective process. There are no right or wrong answers. Experiment with different techniques and find what works best for your style. Studying the work of photographers and artists whose color palettes you admire can be a great source of inspiration. They often use colors to create specific emotions and enhance the overall aesthetic of their work.
Practice Makes Perfect
The best way to learn Lightroom is by doing! Experiment with different settings and see how they affect your photos. Don’t be afraid to make mistakes – that’s how you learn. There are tons of resources online, including tutorials and forums, to help you along the way. Happy editing!